Monday, February 28, 2011

It's a Vinyl Record

I had a busy weekend and didn't get too much done on the Jag.  Today was a little more productive, I got up with intentions of getting a lot done.  Then my dad called and asked if I was going to be home, he and my brother-in-law from Montgomery were wanting to come over to see the car and check out my progress.  Actually I think he was looking for an excuse to get out of the house.  They arrived about lunchtime and took a look around, then we headed out to one of Dad's favorite places for lunch.  It's a little home cooking place in Robertsdale.  He and I had liver and onions, my brother-in-law got some fried chicken. So when I got back to the house, I was about ready for a nap, but instead I got out in the garage to see what I could get done.


The clock in the tach is still at the Jag Clock repair place

Over the weekend I had glued some of the new vinyl cover on the instrument panels and before they got here this morning, I got the rest of it glued and clamped.  When I got back from lunch, it was ready to unclamp and start putting the gauges in.  I actually got the gauges all together, new seals and all and got them installed in the dash.  Then I started on the other various switches, lights and levers that go in there.
I succeeded in getting those in and amazingly, didn't screw any of it up.  I don't have a lot of experience with things like glue and vinyl, so this was definitely a vinyl record for me.  You wouldn't think that putting all the stuff back in the dash would be all that difficult, maybe it isn't, maybe I was just trying to be extra careful, assuming that it won't all peel off tomorrow, I'm very happy with the result.
You'll notice that the toggle switches that go across the bottom are still not installed.  I am trying to recondition them, the toggles are some sort of black plastic, or whatever was being used in 1964.  It's all discolored now and I have been trying different things to make them look better.  It looks like I'm just going to have to order a set of toggle levers.  Now all I have to do is figure out how to get the old ones off and the new ones on.  You can bet that if I go that route, I will be getting all of the advice I can find... the switches are VERY expensive for some reason.

Monday, February 21, 2011

Slow but Steady

It's been a couple of days since I posted anything to this blog.  I have actually accomplished a number of things, all seem somewhat small when looked at alone, but they all add up.  It seems like everything I do, is preceded by looking in the book to make sure I have all the parts ready, often I don't.  Then I search through my picture collection on the computer for pictures that will either show me how it was on my car originally, or look through the hoards of pictured that I have downloaded and somewhat cataloged of other similar cars being restored.  It's been a great reference.  THEN I round up the necessary nuts and bolts, screws, gaskets, and other various parts, some of which need some restoration themselves.  Once that is all done and I'm satisfied that I might actually be able to complete the task, I start on it.  Often, the actual task will only take a few minutes once I have all the pieces.  Of course, anyone doing this type of restoration will eventually come to the realization that all too often, after completing one task, you fine that in order to go to the next task, you will have to undo some part (or all) of the task you just completed.  I wish someone would write a "step by step" restoration guide for the E-Type.  There may actually be such a guide, but that would be classified as "instructions" and who wants to be bothered with instructions...  that's literature for weenies!
So on to what I have accomplished.  About a week or so ago Rodney and I fitted the front suspension, remember?  Well, it looked so good and went together so easily and we were so proud of it, that I had forgotten that we had just "fitted" it.  Mike Darby came over to visit and while he was here asked if I was ready to align the front end.  I told him that I was, so we proceeded, only to find that I had not put the inner washers on any of the rubber bushings, allowing for a substantial amount of slack...  this reminded me that we had only put the front end together to make sure I had everything...  not intending for it to be permanent.  So...  Mike left and I took the front end back apart, installed the inner washers and put it back together.  It would have been a LOT easier if I had put them in to begin with....  but it was ONLY A TEST FITTING!!!  ...sigh...
Having done that, I went ahead and hooked up the brake lines, permanently I hope, and mounted the brake hose.  That was yesterday evening.
Yesterday morning, I went on a field trip with my car club, the South Alabama British Car Club, to a big car collection.  It was a beautiful day and you can read all about it and see some of the gorgeous cars here.


Today, I decided to attach the brake & clutch reservoirs to the frame.  There is a heat shield that goes between the reservoirs and the engine.  It's located on the same side as the exhaust manifold so the heat shield is to prevent the brake fluid from getting too hot.  This heat shield is made of galvanized metal and some kind of fibrous stuff that has taken the place of asbestos, I'm sure.  It was in pretty ugly condition and since I have just become a KoolMat distributor, I decided to use some of their Zero Clearance product.  It's a fiberglass composite mat with a heavy aluminum foil backing and a high temp pressure sensitive adhesive.  It's primarily designed to be used between the muffler or exhaust pipes and the floor to keep the floor cool but this shield looked like a perfect place to give it a try.  It had a peel-off plastic backing so you just peel and stick, pretty simple. Then I hooked up the "Low Fluid" wiring to the brake fluid reservoir caps and voila...  one more step completed.
While I was working in that area, I went ahead and installed the started solenoid and the voltage regulator.  I'm really pleased with how well everything is looking.  I honestly had no intention of taking this restoration this far.


I'm still waiting for the instrument seals to be delivered.  I ordered them two weeks ago tomorrow.  They were supposedly sent out by U.S. Mail on last Wednesday.  As soon as I get those, I will start completing the wiring.  I have to remember though to be sure and install the 3 heater pipes  and the windshield wiper assembly into the dash before I go too far and have to take anything else back apart.

Thursday, February 17, 2011

The New Brakes Are Here

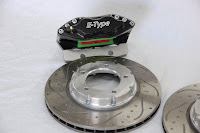
FedEx arrived at my door early today, in fact, a day earlier than I was expecting them.  Uryk at E-Type Fabs in the UK sent me a pair of new front disks and calipers.  Uryk is a real artist.  He built the frames that are on my car.  I was so impressed with their quality, that I actually have gone into business with him.  It's in it's infant stages right now, but because of our arrangement,  he is now able to offer the many (and expanding) special products designed and built specifically for the Jaguar E-Type without having to play the 'Currency Exchange Rate" game.
In addition, I will be available to answer questions, offer assistance and take orders at times that are more convenient for the U.S. customers.  In the future we will be stocking many products here in the U.S. as well, being able to have quicker deliveries than from the U.K.  Aside from his frames, another product that Uryk builds is brakes, specifically designed for the E-Type.  A set of which I received this morning.  They, like the frames are a work of art.  combining beauty with a definite functional, muscular look.

I couldn't wait to get them out of the box this morning, until now, all I had seen was pictures. They actually looked better in person.  I unpacked them and took a few pictures, then I went about mounting them to the hubs that were originally on my car.  As with everything Uryk makes, they fit perfectly and painlessly.  In fact, you can even get a socket on the nut holding the disk to the hub. If you have ever removed the disk from the hub, you will know that getting a socket on the back side is nearly impossible, I had to wedge a screwdriver between the disk and the nut to hold it because the nut was too close to the edge of the disk.  I feel certain that I'm not the only one that has experienced this.  I replaced the old bearings and seal. I packed the new bearings with grease and slipped them on their respective spindles...  constantly reminding myself which side is the "near side".  :-)   Again, they fit perfectly and with the slotted and vented disks, they looked great.  I have no doubt that they will perform just as well.

Tuesday, February 15, 2011

A "Captive Nut" is not an incarcerated crazy person

Stuart got my hint the other day and made it by yesterday to help me get the last screw into the second sugar  scoop.  I wasn't happy with the fit of the lens that I had mounted the other day so I took it back off to see what I could do to make it better.  While messing around with it, I managed to break one of the little cages that hold the nuts off of the bodywork.  it was originally spot welded on, but not having a spot welder, I broke out the 2 tubes of structural adhesive, mixed some up and put the little cage back on the body inside of the headlight opening and clamped it.  That's where I quit for the day.
 
Today, I managed to get both of the headlights with gaskets and chrome surround installed today.  It was not an easy task.  There are six machine screws that hold the chrome trim on.  The screws go into some captive nuts around the perimeter of the headlight opening.  Unlike most captive nuts, these are allowed to move around a good bit so that the ill-fitting trim ring and the likewise ill-fitting gasket will still allow the screw to find the nut... in theory.  In actuality, none of it fits.  It is becoming more and more apparent that this car took a substantial hit in the nose at some point in its life.  The gasket (or seal) that I got in the "complete rubber kit" was completely different from what was on the car when I took it apart.  This new one looks much more impressive.  Thick soft foam rubber with little slots where each of the screws is supposed to go.  But the slots don't line up with the screw holes in the bonnet or the holes in the trim rings.  The simple solution is to make bigger slots in the rubber, which I did.  Last night I put some windshield sealer in the slot in the gasket where the glass headlight cover goes.
The covered headlights is one of the most distinctive parts of the Series 1 E-Type so it has to look good.  I thought that this windshield sealer would dry with a firmness that would help hold the glass in the gasket...  wrong.  it just made a gooey mess.  It took a while to clean the glass and every time I touched it, I left another gooey fingerprint.  Anyway, I finally got it all cleaned up and got the first one installed on the bonnet.  I had one already installed the other day, but wasn't able to get all of the screws started so I had to take it back off and run a tap through each captive nut again.  after that, I got lens number one fully installed.  Lens number 2 wasn't as easy.  It took several passes with a tap through the captive nuts, I was afraid that I was going to break the little cage off that I had repaired yesterday...  it held up fine though.  with much struggling, I finally got the second headlight lens, gasket and trim ring installed.  This whole project killed most of my day.


 But I had some more time so I picked up the center section of the instrument panel that I had glued new vinyl on the other day and I got my X-Acto knife and started cutting out the holes where the instruments and switches go.  This project went off without a hitch. It's not totally complete though, I had to fold the two ends up and glue them down and clamp them.  It should be cured completely in a day or so.  In the meantime, I'll replace the vinyl on the right and left sections of the dash.  Man!  There is a lot of stuff to do when you are building a car.

An interesting thing I noticed, obviously done at the factory, the body number of my car, 7559,  as it appears on the ID Plate is written on the back of both the right and left dash panels.

Monday, February 14, 2011

Sugar Scoops?

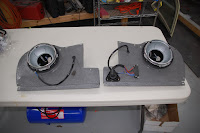
This weekend I think I got a lot done.  When Rodney left the other night, I had been searching high and low for some little captive nuts and holders that go on the headlight buckets.  About 2 minutes after he left, I walked over to the workbench and there they were, in the little baggie that I put them in.  Go figure!  So I proceeded to put the headlight buckets together.  They go into the diaphragm panels that then mount in the bonnet. This whole process requires a pretty specific sequence.  If you don't put it together in the right sequence, you will just have to take it back apart. Don Pritchett came over Saturday night and was a big help getting the diaphragms mounted.  It's a difficult thing for one person to do.  There are a number of wiring connections to be made.  The horns, the headlights and the side marker (parking) lights.  I mounted 2 new "after market" horns and had to fabricate a bracket for them.  Don then helped me run the wires.  I managed to get both sides put together and installed.   


Then came the Sugar Scoops.... They are the little curved pieces of bodywork that fill the recessed hole under the headlights.  I think the same guy must have designed these things that designed the fuel tank.  First you have to figure out how to get the things into the hole where they will reside.  By all appearances, they are too big to go in, but eventually, you turn them just the right way and they just fall in.  Then you have to align 3 captive nuts to get it mounted.  It's kind of like building a ship in a bottle..  but harder.  I got one completed and I got two of the captive nuts lined up on the other one but will need some help getting the last bolt in.  I need somebody to bend the sugar scoop from one side while I start the bolt from the other.  I then was very anxious to get at least one glass cover and chrome surround on so I could feel like I had completed something.  Maybe Stuart will be here tomorrow and he can help me to get the other sugar scoop in.


I also had some time to glue new vinyl on the center section of the dash. I think that went ok, I'm letting the glue "cure" now.  I still have the other two sections to do, but I'm not going to rip the old vinyl off until I see how the center section works out.  I have been doing a lot of things that I'm not real accustomed to doing, but it all seems to be going pretty well so far.

I know I did several other things, but I can't really remember them all right now.  When I think of something, I'll make another post. :-)


Thursday, February 10, 2011

Wires, Wires, Wires

This is probably going to be a short post.  I'm pooped.  I have been working on the wiring for that last day and a half (off & on).  I got the fuse panel wired, that was pretty easy,  Since I am awaiting the gauge seals from Nisonger, I can't connect any of the wires to the instrument panel just yet. So, instead, I started taping labels on the wires when I figured out which one went where.  It's coming along well, I have nearly all of them marked and the ones that aren't are the ones that are pretty obvious.  Having Stuart here working on his Stag has been a big help.  He just happens to be an Electrical Engineer so he's pretty good at reading a schematic.  Rodney came over earlier this evening and helped me run the wires to the back of the car.  Then he watched me wander around looking for one part and then another.  It seems that I have lost every part of this car at one time or another...  I think someone is just messing with me by hiding stuff.  I finally rounded up all the parts for the headlight buckets and started on putting them together.  I'll probably finish that first thing in the morning.


Yesterday, the guy that was doing the welding on my aluminum radiator called and said it was done.  I went and picked it up.  He did an outstanding job.  I had taken my old radiator to him as a pattern for the lower hose connection.  He not only changed the angle like I wanted, he put a larger, heavier pipe on it so that the original equipment hose would work perfectly.  In addition he added a drain.  I am very pleased.


 Tomorrow is going to be mostly a housekeeping day.  I have such a mess in the garage and everything needs to be put back in it's place.  It'll also help me start to find all that lost stuff.

Tuesday, February 8, 2011

The 8 Pin Plug


I had a job in Mobile this morning so I only got to spend a little time on the car.  When I got home, UPS had delivered my new 8-Pin Bonnet Plug.  I have been anxious to get it wired up.  I didn't quite know what to expect, the original ones I have seen in the past don't look to be too conducive to rebuilding.  They are usually extremely tattered and often completely broken.  Mine was in pretty bad shape.  Since everything else on this car is looking so good, I decided to bite the bullet and get a new plug.  I was pleasantly surprised when it came in.  It was fairly easy to assemble, a tremendous improvement to the OEM one. I had to solder each wire on the end, and put it into a screw-down pin and tighten them up (also had to make sure that the wires in both pieces of the plug were in the same holes)  I got it put together in a couple of hours, with coffee breaks along the way.  Now I can install all of the bonnet harness, horns and lights and complete the bonnet.


I also received the dash harness that I was missing.  I had to pay a little more for it than I wanted, but the cheaper one would have taken 4-6 weeks, so it was worth it to me.  Getting the wiring all in the main body of the car is going to be the next big step.  I don't have any jobs for the rest of the week...  at this point anyway...  so I'll be able to devote a lot of time to the project.

I took the aluminum radiator to a welding shop nearby to adjust the angle of the lower pipe. With that done, I will be able to use an original set of hoses.  While he has it, I also asked him to put a drain in the bottom.  It is an aluminum racing radiator, for a Ford, I think.  As I mentioned a few days ago, Ray Livingston wrote an article about it and I decided to give it a try.  It was hundreds of dollars cheaper than one specifically designed for an E-Type.

Other than that, I got to install the bonnet latches on the firewall and Stuart was here so he took a break from dismantling the Stag so we could scratch our heads over the dash wiring.  I'll keep you posted on how that goes.