Wednesday, March 30, 2011

I just got "Noodled"

I finally got the E-Type's pedal box installed. I was waiting on the "servo seal" to come.  I had ordered it from one of the usual parts places and it had been back ordered, so I called the other usual place I order from and they had it.  When it came in, it was something like $16.00 and $8.00 shipping.  I wish I had taken a picture of it to post here.  It was, and I'm not lying, a piece cut off of what is known in this area as a "water noodle"  A noodle is a long round plastic/foam tube that kids play with in the water.  I could have gotten one at the Dollar Store up the street had I known.  My car didn't have one when I took it apart so I wasn't sure of what it consisted.   I figured it was some kind of special seal.  Needless to say, I was wrong.  Anyway, I stuck the cut off piece of water noodle on the back of the brake servo and got it mounted to the bulkhead.  Now I have to assemble the accelerator peddle and it's pedal box, it should be pretty simple.  I was going to do it right after I finished with the brake box, but then I remembered that the steering column went through this box and I had not yet refurbished the steering column.  That I will finish in a few days.
I also installed the taillights and had to fiddle with the gaskets a lot.   They don't fit worth a flip.  Then once I got them all mounted, the fit was horrible.  I could have sworn that they fit much better before I had taken them to be chromed.  School is still out on what exactly I'm gonna do to make the fit better.  I did learn something very useful from Rodney .  He was over here and I was about to soak the lens from the backup light in some bleach.  It's clear plastic and had yellowed.  He told me to just put it in the dishwasher.  I thought he was nuts, but since he is a good friend and is really pretty dang smart, I stuck the thing in the dishwasher with the rest of the dishes (I had to put it in the little basket to keep it from flying around).  When Donna took it out and asked me what it was, I was astonished!!!  It looked like it was BRAND NEW!!!  It was crystal clear and not a sign of the yellowish tint that it had before.  I'm thinking I should have been sticking all the parts in the dishwasher.  Give it a try.
Now for the good news...  I am pretty sure I have ALL of the wiring completed, with the exception of hooking up the steering column electrics, that should be very straight forward.   Once that is in and connected, I can start putting the interior upholstery and carpets in, install the door and window seals..  It's really coming together.  I should be getting the 5-Speed transmission and the rear brakes from E-Type Fabs in the UK pretty soon. I'm starting to think that a mid-summer completion date is a real possibility.

The mail came today and with it, my reconditioned XJS wood.  

The grain looks just like a Growler
Saul replaced the ashtrays with cupholders
  If you remember a couple of posts back, while searching for a shorted connection, I had to remove some of the wood from the console and the veneer started curling up and falling off.  At that point I decided to bite the bullet and send all the wood off to British Autowood in Florida.  Saul Chaplin is the proprietor and resident artist.  Take a look at his website, this man has made some of the most beautiful wood pieces for automobiles that I have ever seen.  I couldn't wait to get mine out of its box.  He had sent me a picture of it, but to see it in real life makes you wonder just how someone can do work this gorgeous by hand.  An interesting touch is seen just below the radio, in front of the shift lever.  It looks almost exactly like the Jaguar Growler logo.
And he also embossed the Leaper logo in the door panels and a Growler on the glovebox.  I'm extremely happy with the finished product.


Notice my $45 Momo steering wheel :-)
I almost immediately started putting it back in the XJS.  Stuart came over to take a look and give me a hand.  It went well, and the V-12 Jag is back on the road, prettier than ever.

Tuesday, March 22, 2011

A little over a week... and what have I done?

I have finally gotten the chance, and built up the motivation to post another entry to my blog.  It's been over a week since I have posted any of my progress.  It hasn't been an incredibly productive week either.  There have been a number of things that have interrupted my rhythm. I spent a day and a half last week in the edit suite working at my regular job. Then on Saturday I rode to New Orleans with Mike Darby in his fabulous MGA 1600.  It was a gorgeous day and the New Orleans club put on a spectacular show with 143 British cars on the field that included 10 MGAs and no less than 7 Morgans, along with a multitude of other marques. There are a ton of pictures on the SABCC Picasa site http://tinyurl.com/6cdh7ky .  So, in spite of those little asides, I did actually get some work done on the E-Type. Let me point out here to some of my less "internet savvy" friends.  You can click on the small pictures in this blog and see the full sized picture..
As you may remember, I had gotten all of the parts for the pedal box cleaned up and clear coated.  Well, now I have it all put back together, and it would be in the car by now but I am waiting on a new seal to arrive. It goes between the back of the booster and the bulkhead. It's foam and about the size of a Krispy Kreme doughnut (glazed, of course).  I'm not too sure exactly what it does, but in belongs there so I'll wait till it gets her and put in a new one.  The old one was practically dust when I took it apart.

Now when I tell you this was like putting together a jigsaw puzzle, I'm not kidding.  I don't know how many parts there are, but there are some very strong springs that have to be fitted to help return the clutch pedal, a big fiber washer that must fit in between the pedals and then you have to line up a shaft and shove it through, guessing where the correct spline lineup would be.  If the 2 pedals don't line up, you have to take it back apart and try it again.  I was lucky, I only had to take it back apart once. I rebuilt the two brake master cylinders (one operates the front brakes and one operates the rears) and I replaced the clutch master cylinder with w new one.
While waiting for the booster seal to get here, I directed my attention back to the instrument panel and the wiring.  I completed wiring the center instruments, installed the driver's side instruments containing the tach, speedometer and a few levers and lights. That went well and I got it installed.


  Then I put in the passenger's side.  This first involved installing the glovebox.  I had bought a new one of these.  It's basically a heavy cardboard, folded and riveted into shape.  Oddly enough, it is only held in by a small bar bolted across the top fold. I saw a spot where I could add a little more structural support, so I got an oval body washer and bolted it to one of the screws that holds the passenger handle on.

So now the dash is in all except the top dash pad.  My good friend Mike Darby has convinced me to recover it.  Let me point out here that when I started this project, I had no intention of taking it anywhere near this far.  But the dang car looks so good now that every thing that I thought would be "good enough" is now not and needs to be recovered, revitalized, reconditioned or replaced.... Sigh....   Fortunately most of the stuff I need has already been purchased over the last 3 years.

Also, about a week ago I got the stuff back from the chrome plating shop.  It included the parking lights, brake/tail lights, handbrake, mirror mounting rod, rear hatch prop rod, and a few other odds & ends.


I reconditioned the light fixtures and have installed them into the chrome housings for the parking and brake lights. I have most of the fiddly rubber gaskets spot glued onto the housings so I can then put them on the car.  I had to replace a couple of the innards of the light fixtures on one of the brake lights. I also have purchased all new lenses. Hopefully they will all be going on the car real soon. Then it will start looking even more like a car.


Just this afternoon, I got the heater valve installed on the bulkhead. Yeah, it's new too, not too expensive...  and from what I understand, probably not as functional as the original but it looks good.  If it gives me much problem, I still have the original one and it CAN BE REPLACED! 

I won't be getting much done on the car tomorrow, but that's OK.  Tomorrow morning I'm taking my 90 yr old dad down to the Gulf to do a little sitting, watching the water (which he loves), enjoying the cool breezes and having a good lunch of crabmeat canapes at my sister's house.

Friday, March 11, 2011

This is gonna be one cool Jag!

It was a productive day today.  I got the instruments all mounted in their respective holes in the instrument panel, mounted it in the car and started wiring it up.  Rodney came over and gave me a very welcomed hand. We got all of the gauges and switches wired and now I'm ready to mount the speedometer and tach on the driver's side of the car and get started wiring that.


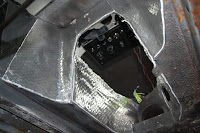
We took a coffee break, discussed some ideas while listening to some Simon & Garfunkel on XM Radio.  I mentioned to him that now that I had some of the Zero Clearance insulation material in stock that I was thinking about lining the inside of the transmission tunnel with it.  Zero Clearance is a fiberglass & polyester insulation bonded to a heavy, diamond patterned aluminum foil with an industrial strength peel & stick adhesive for attaching it to the body.  Being the go getter that he is, he thought now was a good a time as any to give it a whirl.
So... we did.  I raised the lift to a good working height and we started measuring and making templates.  Rodney cut it, so we knew it'd fit perfectly.  I peeled and stuck it.  The first piece fit like a glove, and it looked great.  At least we thought so.

We made another template, cut the stuff to fit and stuck it on.  It too looked great.  Encouraged, we proceeded down the tunnel. It actually well very well and looks outstanding... more importantly, it, along with the KoolMat inside, will make for one cool Jag during the hot Southern Alabama summers.


Rodney works with many insulating types of products in his real job at Marspec and mentioned that the Zero Clearance wasn't going to be water resistant and that we would need to caulk the edges to keep moisture from seeping in.  Having nearly a full can of seam sealer that I had used before painting the car, we decided that would work just fine.  I masked about a quarter inch from the edges of the seams in the insulation so once the seam sealer is applied and dry, I could pull the tape off and it would, hopefully, leave a nice looking seam.  I'll pull the tape tomorrow.
It was a good day, and I feel pretty good about what we accomplished.  If anyone would like some of the Zero Clearance Insulation, drop me a line.  I am now a dealer.  :-)

Tuesday, March 8, 2011

Toggles

I just got the little bottle of Great Knobs in today.


It's and ink or a dye or something that a friend ran across and when he read my blog about how nasty my  toggle switches were he sent me the link.  The place is called Pensbury Manor Garage and the stuff is called Great Knobs.  If you don't remember what the toggle handles looked like before I started, here they are.


I got an artist's paint brush from my wife (one that she wasn't going to use)
It was pretty simple, just dip and brush. then set them where nothing can touch em for about 30 minutes and it's done.  I'm very pleased with the outcome.  Tomorrow I'll be putting the instrument panel back in, hopefully.


Brakes and Pedal Box

Looking at the car and trying to decide what to do next, I settled on the pedal box and the master cylinders.  I had partially disassembled the pedal box a long time ago, but left the servo linkage intact because I knew if I took it apart, when I went to put it back together, I would have a real struggle.  It's like a puzzle.  As is it, I'm still concerned about putting it back together and I JUST took it apart.
I went ahead and took it apart, there are a number of nylon washers and spacers that are very discolored, I ordered a new set that should be here in a day or so. After getting it apart, I carefully cleaned each piece and clear coated them with a light coating of clear enamel.
With this awaiting the rebuild kit, I directed my attention to the master cylinders... yes plural, it has two brake master cylinders.  It was an early solution to compliance with safety standards, one controls the front brakes and one controls the rear.  Mine were pretty nasty looking.  I took them apart, cleaned them thoroughly and began honing the bores.  Knowing that this was ahead of me, and realizing that the bores were only 5/8" diameter, I had ordered a brake cylinder hone that would fit since none of the ones I had would go down that small.  Once getting the cylinders honed smooth, I then needed to get some brake fluid and assembly lube. The fluid I got from O'Reilly's and a small bit of assembly lube from my good friend Mike Darby  Since I had decided to use DOT5 fluid, I was concerned about the assembly lube.  Once assured that it would be OK to use the lube with the DOT5 fluid I proceeded.
The master cylinders are simple systems and went together fairly easily. Except when I was putting the spring part together on one of them and it slipped and launched the end piece out of my hand and across the shop. I had to spend nearly an hour finding it.  Hopefully I will find out if they'll stop the car one of these days.  Once I get the bushings in for the pedal assembly, I'll be posting that process.

Saturday, March 5, 2011

"...the pipes, the pipes are calling"

I have been putting off reinstalling the heater pipes in the bulkhead because, as is written in any number of Jaguar forums, replacing the heater crossover pipes can be a daunting task, resulting in a real dilemma.  First it is said that you need a small child with long thin arms and small hands to help reach into the depths of the bulkhead behind the dash, but you also need to be able to drink a lot of beer and shout out many words that might be less than appropriate for young ears.  Well, evidently, I was lucky today.  I didn't have a young child helping, but I had Rodney and he is pretty used to my vocabulary during stressful situations.  Also, the heater pipes went in without a lot of the difficulty that I was expecting.
This long pipe has to go where????

When Rodney arrived today, we set about looking for the next thing that needed doing on the E-Type.  He suggested that we put the heater crossover pipes in.  He's an MG man so what did he know?  I figured as long as I had some willing help, that we could attempt it.  I first got online and did just a little research in the Jag-Lovers archives and read a few forum discussions on the process.  In retrospect, not all was totally accurate, but it was helpful nonetheless.
The wires fed through the pipes and the bulkhead were very helpful.
The pipes are down in there!


One hint I remembered from an article I had read some time ago was to run some mechanic's wire though the hole in the bulkhead and into the inside of the car, run it then through the lower crossover pipe (the long one) and back out through the other hole for that pipe Thus allowing yourself a guide to then pull the pipe into position.  (I know that to most of you reading this I'm talking Greek, but bear with me.)

This process went off fairly easily and with very little effort, the first pipe was in.  The second pipe went in even easier using the same method.  The third pipe went it with little or no effort.  We put the rivet plates on the outside of the pipes and set the rivets, having to help on a few with a drill to resize the holes.  All of this was done with the entire wiper assembly in place.  It never got in the way at all, contrary what I had read.

Riveting the outer plates.
The pipes come through here.
If any of the Jag people out there want to contact me about any specifics of what we did, feel free to send me an email and I will be happy share my experience with you.

Friday, March 4, 2011

Stripped Naked

The last couple of days I have been working on my 1988 XJS.  The turn signals have not been working the last couple of times I have driven it so I decided to figure out what the problem was.  To begin with, I checked the fuse, not an easy one to get to either.  It was blown.  I replaced it and that one blew as soon as I turned on the ignition... sigh... I then got out the book to see what all was on that circuit.  The wiring diagram can be a bit confusing.  I tested a few things with no luck.  Curiously, the emergency flashers worked but the turn signals didn't, in checking though I discovered that my brake lights didn't work either.  At that point I solicited the help of my electrical engineer friend Stuart.
We started checking circuits and deciphering the wiring diagram. There are 3 or 4 different wiring diagrams for the XJS in the shop manual, covering different models.  There is also a big fold-out one in the Owner's Kit.  Turns out that the one that came with the car isn't exactly right.  Stuart located one in the shop manual that seemed to be right, at least as it applies to this particular circuit.
One relay is right under the 2 white plugs on the right.
This car has a number of relays and complex circuits so we had a lot to check.  One of the pertinent relays was under the center console, so we removed the console...  the wood veneer on the console was already cracked and chipping, when we took it out, it started falling off in big chunks.  This is a common problem with Jaguar wood after it's been exposed to sunlight for a long time.  The wood on the dash does the same thing.  Anyway, the relay under the console wasn't the culprit.  We explored further and finally decided to call it a night around 10:00.  I had a job in Mobile the next day so I wasn't able to do anything on it until the afternoon.  When I got home, Stuart was already here and had successfully found the problem.  I'm ashamed to say that it was something I had done accidentally.
You can see the squeezed insulation.
When I replaced the Throttle Position Sensor a few months ago, I had inadvertently pinched a wire on the adjacent kick-down switch as I tightened the throttle body down.  This caused the wire to short to ground and blow the fuse.  What a fluke. We replaced the fuse and everything is now working.
But by now the car's interior had been stripped of a lot of its interior pieces and I decided to not reinstall the chipped and split wood pieces.  I called Saul Chaplin at British Autowood and made arrangements to send the pieces to him for refinishing.  His work is amazing and probably exceeds the original quality of the Jaguar wood which was awesome in its own right. 


In a program about Jaguar manufacture that I once saw, the announcer stated that the "guys in the Jaguar woodworking shop were convinced that Jaguar built cars just so that they could show off their beautiful wood".  I kinda doubt that's the case, but the wood in a Jaguar (except the E-Type which has no wood in it) is well known for its beauty. I removed the rest of  the wood from the dash and the door panels and have them packaged and ready to send to Saul.  Hopefully I'll get back on the E-Type this weekend.

This morning I cut the yard...  SPRING IS HERE!!